BlockBench Complete Guide: Creating 3D Models for Godot Engine
Are you looking for a free, powerful, and user-friendly 3D modeling tool for your Godot projects? Look no further than BlockBench! This incredible open-source editor has revolutionized the way developers create low-poly 3D models, and today we’ll dive deep into everything you need to know about this amazing tool.
What is BlockBench?
BlockBench is a free, open-source 3D model editor that was originally designed for creating Minecraft models, but has evolved into a versatile tool perfect for any low-poly 3D modeling needs. Whether you’re developing indie games, creating assets for Godot Engine, or just exploring 3D art, BlockBench offers an intuitive and powerful solution.
Key Features That Make BlockBench Special:
🎯 Low-Poly Modeling Excellence
- Cuboid-based modeling for that perfect pixelated aesthetic
- Advanced mesh modeling tools for complex low-poly shapes
- Perfect for indie game development and retro-styled projects
🎨 Integrated Texture Tools
- Built-in texture editor with painting capabilities
- Automatic UV mapping and template generation
- Palette creation and management system
- 3D painting directly on your models
⚡ Powerful Animation System
- Comprehensive animation editor with keyframe support
- Bone rigging for character animation
- Position, rotation, and scale animations
- Graph editor for fine-tuning animation curves
🔧 Extensible Plugin System
- Built-in plugin store with community extensions
- Custom export formats and tools
- Ability to create your own plugins
- Constantly expanding functionality
💰 Completely Free & Open Source
- No licensing fees or subscriptions
- GPL license ensures it stays free forever
- Cross-platform: Windows, macOS, and Linux
Getting Started with BlockBench
Installation Process
Getting BlockBench up and running is incredibly simple:
- Visit the Official Website: Head to blockbench.net
- Choose Your Platform: Download the version for Windows, macOS, or Linux
- Install and Launch: Follow the standard installation process for your OS
- Start Creating: Launch BlockBench and you’re ready to begin!
Your First Model: A Step-by-Step Tutorial
Let’s create a simple character model to get you familiar with BlockBench’s interface:
Step 1: Create a New Project
- Launch BlockBench
- Click “New Project”
- Choose “Generic Model” for Godot compatibility
- Set your texture resolution (64x64 or 128x128 for low-poly aesthetics)
Step 2: Basic Modeling
- Use the Cube Tool to add basic shapes
- Resize and position cubes using the transform handles
- Build your character’s basic silhouette (head, body, arms, legs)
Step 3: Texturing
- Switch to the Paint tab
- Use the built-in tools to paint directly on your model
- Create color palettes for consistent styling
- Apply textures to different model parts
Step 4: Animation Setup
- Switch to the Animate tab
- Create bone groups for different body parts
- Set up a simple walk cycle or idle animation
- Use keyframes to define movement
Step 5: Export for Godot
- Go to File > Export
- Choose glTF 2.0 format for best Godot compatibility
- Save your model and textures
Advanced BlockBench Techniques
Optimizing Models for Godot Engine
When creating models for Godot, keep these optimization tips in mind:
Polygon Count Management:
- Keep vertex counts reasonable for your target platform
- Use LOD (Level of Detail) techniques for distant objects
- Remove unnecessary internal faces
Texture Optimization:
- Use power-of-2 texture sizes (64x64, 128x128, 256x256)
- Combine multiple textures into texture atlases
- Use appropriate compression settings in Godot
Animation Best Practices:
- Keep bone counts manageable
- Use linear interpolation for retro aesthetics
- Optimize animation curves to reduce file size
Creating Modular Assets
BlockBench excels at creating modular, reusable assets:
- Design with Modularity in Mind: Create separate models for different parts
- Consistent Scaling: Maintain uniform scales across all assets
- Shared Textures: Use common texture palettes across multiple models
- Snap-Together Design: Design pieces that fit together perfectly
BlockBench to Godot Workflow
Here’s the optimal workflow for using BlockBench models in Godot:
Export Settings
1
2
3
4
5
Format: glTF 2.0 (.gltf + .bin + textures)
Settings:
- Export Animations: ✓
- Export Textures: ✓
- Embed Textures: ✗ (for better organization)
Import in Godot
- Drag and Drop: Simply drag your .gltf file into Godot’s FileSystem
- Import Settings: Adjust import settings if needed
- Scene Setup: Add your model to a scene as a MeshInstance3D
- Material Setup: Fine-tune materials in Godot’s material editor
Animation Integration
- Import animations will appear in Godot’s AnimationPlayer
- Use Godot’s animation features to blend and control animations
- Combine with code for interactive character controllers
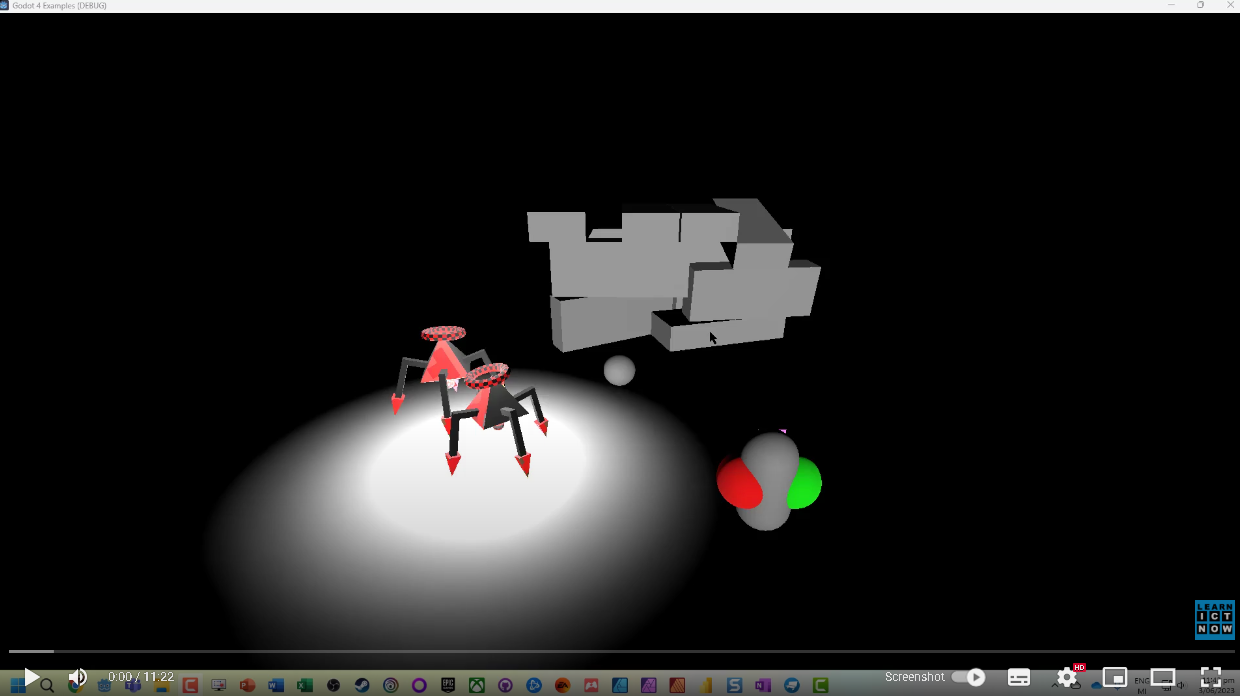
Watch BlockBench in Action
To see BlockBench’s capabilities in action and get a visual understanding of the workflow, check out this comprehensive tutorial:
This video demonstrates advanced BlockBench techniques and shows real-world modeling examples
Common Use Cases for Game Development
Character Modeling
- NPCs and Protagonists: Create memorable characters with distinct silhouettes
- Enemy Design: Design creatures and monsters with consistent art style
- Customizable Characters: Build modular character systems
Environment Assets
- Props and Furniture: Create interactive objects for your game world
- Architectural Elements: Design buildings, walls, and structures
- Natural Objects: Model trees, rocks, and landscape features
UI and Interface Elements
- 3D Icons: Create dimensional icons for inventory systems
- Interactive Buttons: Design 3D UI elements
- Decorative Elements: Add visual flair to your interfaces
Tips for Beginners
Start Simple
- Begin with basic geometric shapes
- Focus on silhouette before details
- Practice with simple objects before attempting characters
Learn the Hotkeys
- Ctrl+Z: Undo (your best friend!)
- G: Move/Grab tool
- R: Rotate tool
- S: Scale tool
- Tab: Switch between Edit and Object mode
Study References
- Look at existing low-poly art for inspiration
- Analyze successful indie games’ art styles
- Practice recreating simple objects from reference
Join the Community
- Discord Servers: Join BlockBench and Godot communities
- Forums: Participate in discussions and ask questions
- YouTube Tutorials: Watch community-created content
- Social Media: Follow #BlockBench and #GodotEngine hashtags
Advanced Features and Plugins
Essential Plugins for Game Development
Godot Exporter Plugin:
- Specialized export options for Godot Engine
- Optimized settings for game development
- Batch export capabilities
Animation Tools:
- Advanced rigging systems
- Procedural animation generators
- Motion capture import tools
Texture Enhancement:
- Normal map generators
- Ambient occlusion baking
- PBR material creation
Custom Scripting
BlockBench supports JavaScript plugins, allowing you to:
- Automate repetitive tasks
- Create custom export formats
- Build specialized modeling tools
- Integrate with external pipelines
Performance Considerations
Optimization Strategies
Model Complexity:
- Target 500-2000 triangles for main characters
- Use 100-500 triangles for background objects
- Implement LOD systems for distance-based optimization
Texture Management:
- Use texture atlases to reduce draw calls
- Implement mipmapping for distant objects
- Consider texture streaming for large worlds
Animation Optimization:
- Reduce keyframe density where possible
- Use animation compression in Godot
- Implement animation culling for off-screen objects
Conclusion
BlockBench is an invaluable tool for any game developer working with Godot Engine. Its combination of powerful features, user-friendly interface, and completely free price point makes it an essential addition to your development toolkit.
Whether you’re creating your first indie game or you’re a seasoned developer looking for an efficient modeling solution, BlockBench provides everything you need to bring your 3D visions to life. The seamless integration with Godot Engine makes it particularly attractive for developers in this ecosystem.
Getting Started Today
- Download BlockBench from the official website
- Follow this tutorial to create your first model
- Import into Godot and see your creation come to life
- Join the community to share your work and learn from others
The world of 3D modeling doesn’t have to be intimidating or expensive. With BlockBench, you have professional-grade tools at your fingertips, ready to help you create amazing assets for your Godot games.
Have you tried BlockBench for your Godot projects? Share your experiences and creations in the comments below! We’d love to see what you’ve built with this amazing tool.
Resources: